Welcome to Precision Toxicology Metadata Manager’s documentation!
Precision Toxicology Metadata Manager
![]()
![]()
![]()
![]()
The PrecisionTox Metadata Manager is a tool to help manage metadata about samples collected in the lab. It is part of the PrecisionTox Consortium and is used to ensure that metadata are correct and can be used to find data files.
Table of contents
Introduction
Video tutorial
Objectives
Getting started
Requirements
Setup
Production
Architecture
Development process
Components
Database: Entity Relationship Diagram (ERD)
Development
Testing
Documentation
Static typing
Introduction
Video tutorial
Objectives
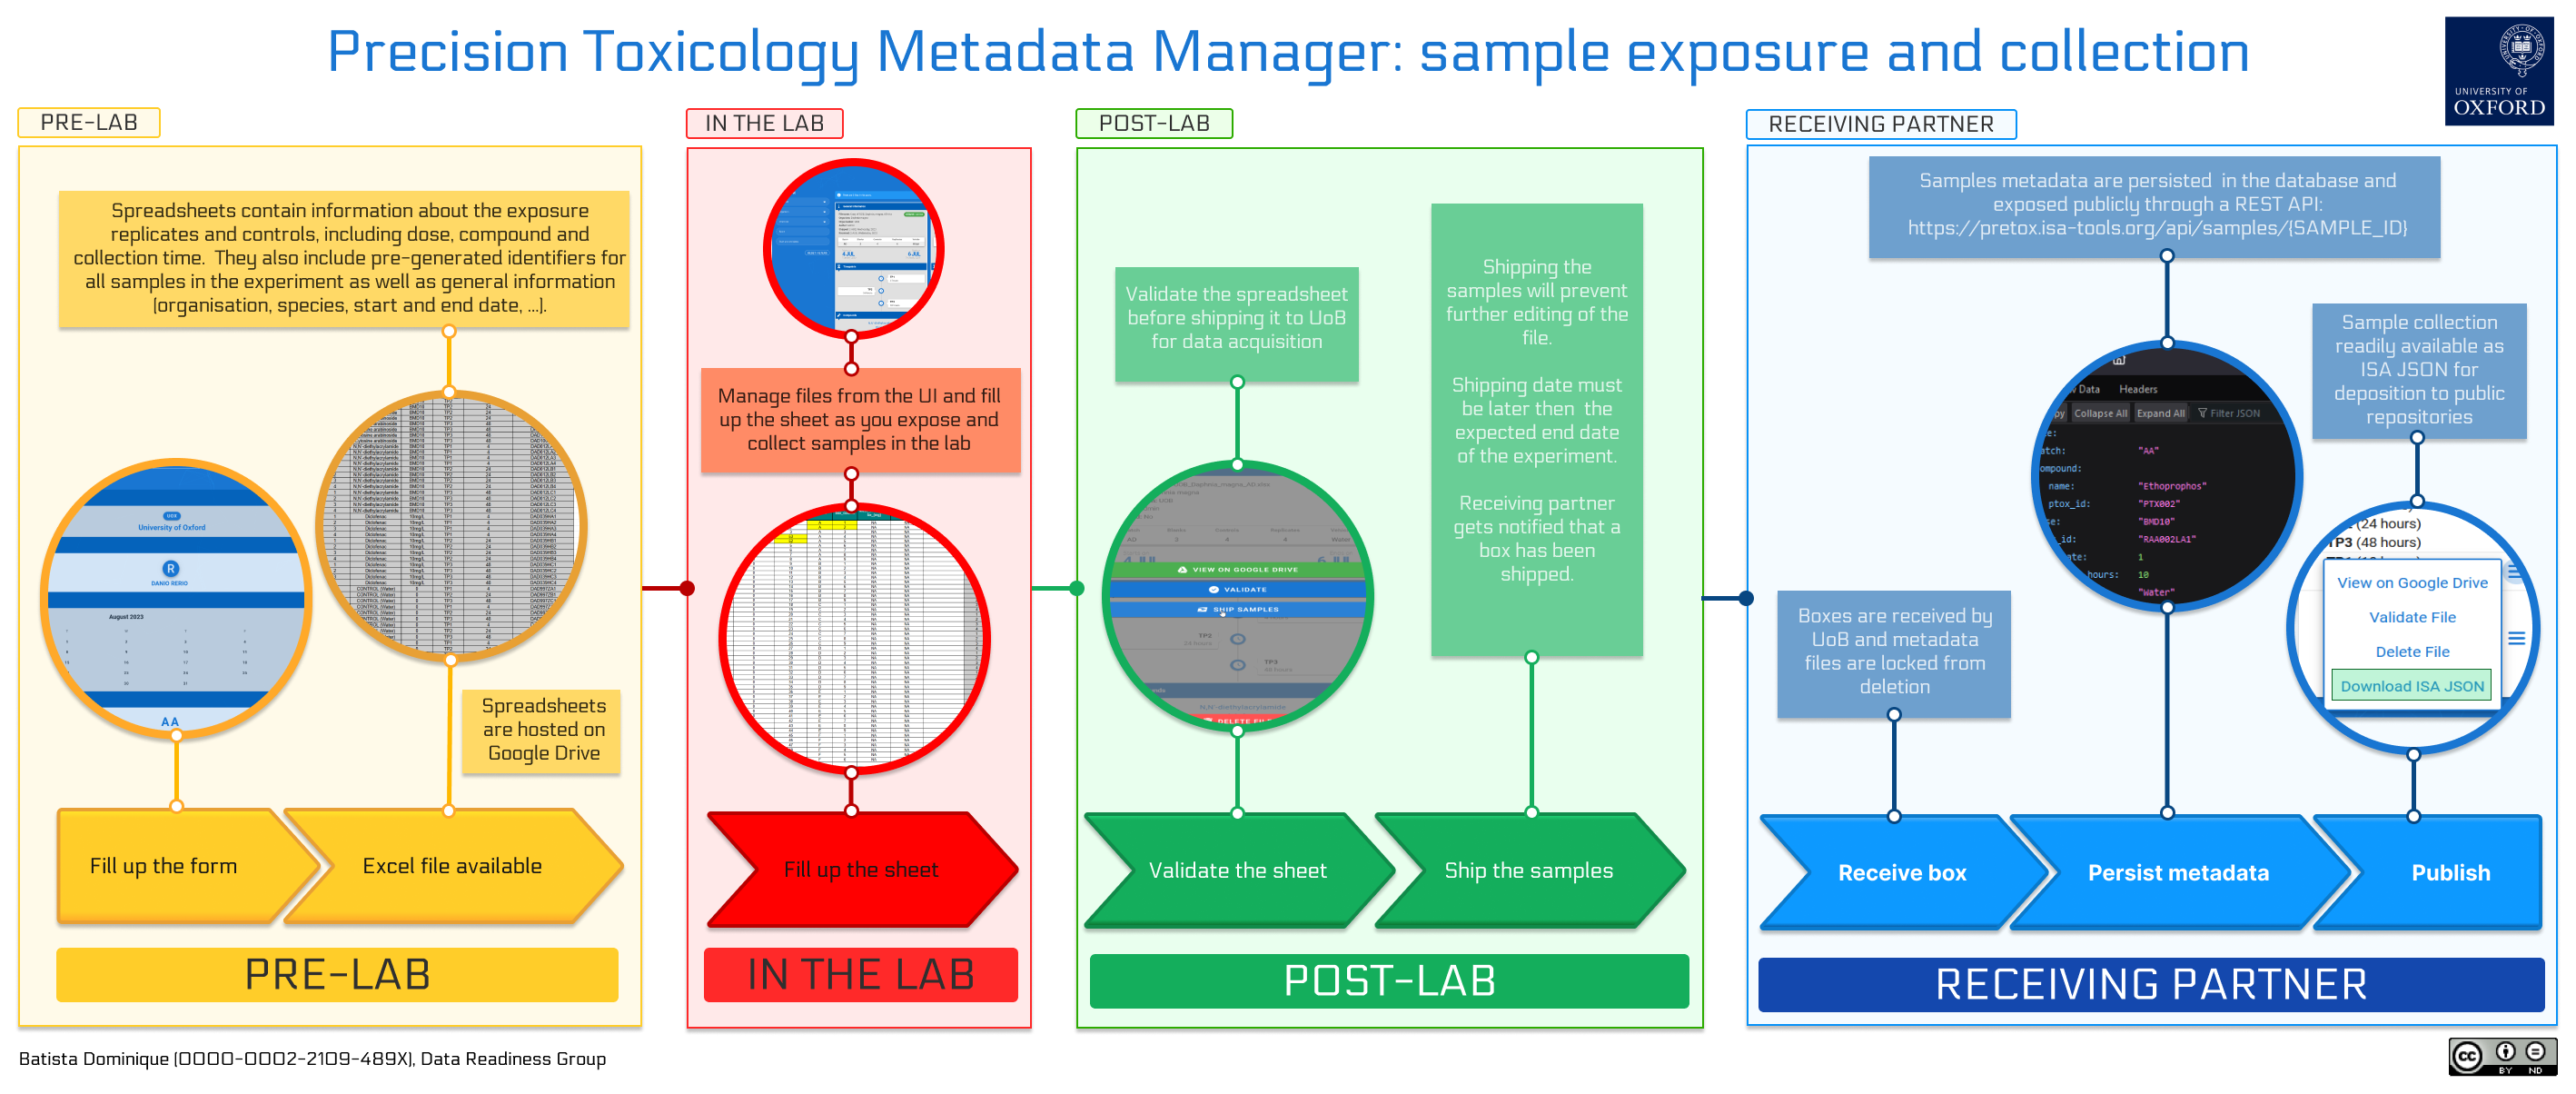
The precision toxicology metadata manager was created to help partners producing data in the PrecisionTox Consortium to create, find, validate and share metadata about samples they collect in the lab. The idea behind the tool is to operate at planning stage, before organisms are even exposed to compounds and samples are collected. These samples are meant to be shipped to a central partner who will perform material extractions for RNAseq and mass-spectrometry data acquisitions. The tool ensures that metadata do not contain any error, can be used to find physical samples in the boxes shipped to the core facility and that the experimental results can be produced in a FAIR and publishable way.
Consortium partners producing samples are invited to fill a form based on an experimental design defined by the consortium. The form generates Excel files containing metadata about sample exposition and collection divided into two sheets:
a first sheet containing specific information about the samples. This includes which replicates are exposed to which compound, at which dose, with which vehicle, and after how long they were collected. It also includes a unique identifier for each exposed replicate, each control and each empty tube based on a following pattern:
organism_code:exposure_batch_code:chemical_compound_code:dose_code:timepoint_code:replicate_code.a second sheet containing general information about the experiment, such as the organisation, the species, the start and end date, etc.
The spreadsheets are then uploaded to a shared Google Drive folder and opened for editing for when users hit the lab. The tool keeps track of the files uploaded to Google Drive, can import external files, and can validate the content of the spreadsheets. These validation steps are mandatory and must be performed before the files and boxes can be shipped.
Once marked as shipped, the file is locked and cannot be edited anymore.
Upon receiving the physical sample boxes, users from the receiving partner can then mark file as received.
The tool will generate a standardised version of the file
using the ISA-JSON format, which can be imported into the ISA-tools suite, merged with metadata from metabolomics and
transcriptomics, and deposited to public repositories such as EMBL-EBI MetaboLights and ArrayExpress repositories.
Finally, the sample metadata are registered in a purpose-built database and be requested through a RESTful endpoint. This allows users to search and retrieve sample metadata through both programmatic and web interfaces while providing stable, persistent and unique identifiers for each record.
Getting started
Requirements:
Python 3.9 or newer
A Google Cloud Platform account with the Google Drive API and GMail API enabled.
An SQL database running. Tested with SQLite.
Setup:
Clone and install the dependencies in a virtual environment:
git clone https://github.com/precisiontox/ptox-metadata-manager.git
cd ptox-metadata-manager
python -m venv venv
source venv/bin/activate
pip install -r requirements.txt # for production
pip install -r requirements-dev.txt # for development
mv ptmd/resources/.env.example ptmd/resources/.env # Create the .env file
Before running the application you need to obtain a Google Drive ID and secret: head to your Google Cloud console and
enable the Google Drive API and the Gmail API. Then, go to API & Services > Credentials and create a new OAuth client
ID using the Desktop Application option. Once done, you will be presented with a client ID and a client secret you
will want to copy.
Inside the ptmd/resources/ directory, rename .env.example to .env and fill in the values for your environment.
# Parameters for the Flask app
SQLALCHEMY_DATABASE_URL=sqlite:///:memory:
SQLALCHEMY_SECRET_KEY=A_SUPER_SECRET_KEY_TO_ENCODE_PASSWORDS
SITE_URL=http://localhost:5000

# Parameters for the Google Drive API
GOOGLE_DRIVE_CLIENT_ID=Your_google_api_id
GOOGLE_DRIVE_CLIENT_SECRET=Your_google_api_secret
GOOGLE_DRIVE_CREDENTIALS_FILEPATH=Absolute_path_to_google_drive_credentials_file
GOOGLE_DRIVE_SETTINGS_FILEPATH=Absolute_path_to_google_drive_settings_file

# Parameters for the default admin account
ADMIN_EMAIL=your@email.com
ADMIN_USERNAME=admin
ADMIN_PASSWORD=admin
The environment variables are divided into three categories:
The Flask applications configuration variables:
SQLALCHEMY_DATABASE_URL: this is the URL to your database. You can use sqlite, postgres, mysql, etc., e.g. sqlite:///ptmd.db, and will need to change this before running the application.SQLALCHEMY_SECRET_KEY: this is the secret key used to encrypt hashes and other sensitive data.SITE_URL: the URL of the JavaScript client (used for sending activation and reset links through emails).
The Google Drive API configuration variables:
GOOGLE_DRIVE_CLIENT_ID: the Google Drive client ID obtainable in your Google Cloud Console (see above).GOOGLE_DRIVE_CLIENT_SECRET: the Google Drive client secret obtaining in your Google Cloud Console (see above).GOOGLE_DRIVE_CREDENTIALS_FILEPATH: the path where to store the credentials file created during first boot. This needs to be a json file (e.g. credentials.json).GOOGLE_DRIVE_SETTINGS_FILEPATH: the path where to store the settings file created during first initialization (e.g. settings.yaml). Note that a.ymlextension will not be accepted, please use.yamlinstead.
The admin account configuration variables.
ADMIN_EMAIL: the email address of the admin user. This is used to send emails to the admin user when a new user registers.ADMIN_USERNAME: the username of the admin user. This is used to create the first admin user. Cannot be changed.ADMIN_PASSWORD: the password of the admin user. This is used to create the first admin user. Can be changed later.
You can now run the following command and accept the application in your browser. This is done once only during first initialization. It will download the Google API credentials file and generate the database once you are done. Finally, it will boot the flask API in your local host.
Note: The Google credentials can be generated on any machine and then copied to the server where the application is
running if path in the .env file matches the path on the server.
python -m app
Once the API is booted go to http://localhost:5000/apidocs to see the Swagger documentation.
Production
In order to run the application in production you will need a web server and a WSGI. It has been tested with
Apache/Passenger and Nginx/Gunicorn. You will also want to configure your web server so that files under
the ptmd/resources/ directory are not served.
Finally, you need to set the publishing status of your application status to ‘In Production’ in your Google Cloud
Console. This will allow the application to refresh authentication tokens automatically.
Architecture
The frontend client
A NuxtJS web application accessible in development and production. It is responsible for the user interface and the communication with the API.
The backend API
It is hosted in this repository. It contains a Flask application exposing a REST API and is plugged to a relational database through SQLAlchemy. It is responsible for authentication, all functionalities logic and the persistence of (meta)-data.
Development process
The API documentation is provided by a Swagger documentation, letting users query the API
through a web UI. The code is documented using docstrings and the documentation is available on
readTheDocs.
The application is entirely unit-tested, typehints are checked with mypy, code quality is surveyed by Codacy
and styles are enforced by flake8, all as part of the continuous integration pipeline.
Components
The application source code is contained in the ptmd directory and divided as such:
The
apidirectory contains the flask application exposing the REST API. It includes routes definitions, the JSON Web Token authentication logic and the validation of user inputs through JSON Schema.The
bootdirectory contains the code responsible for booting the application, like seeding the initial data into the database.The
constdirectory contains the constants used throughout the application.The
databasedirectory contains the database models and complex queries. Interactions with the database is mostly defined as methods of the model classes.The
libdirectory contains the code responsible for the business logic, like the interactions with the spreadsheets and the Google Drive API, sending emails and generating ISA-JSON files.The
resourcesdirectory contains the assets used by the application, like JSON schemas, swagger yaml files, data files for organisations and chemicals, etc.
Tests are contained in the tests directory and divided mirroring the application exact structure. They require no
data files and no interaction with the database to be executed.
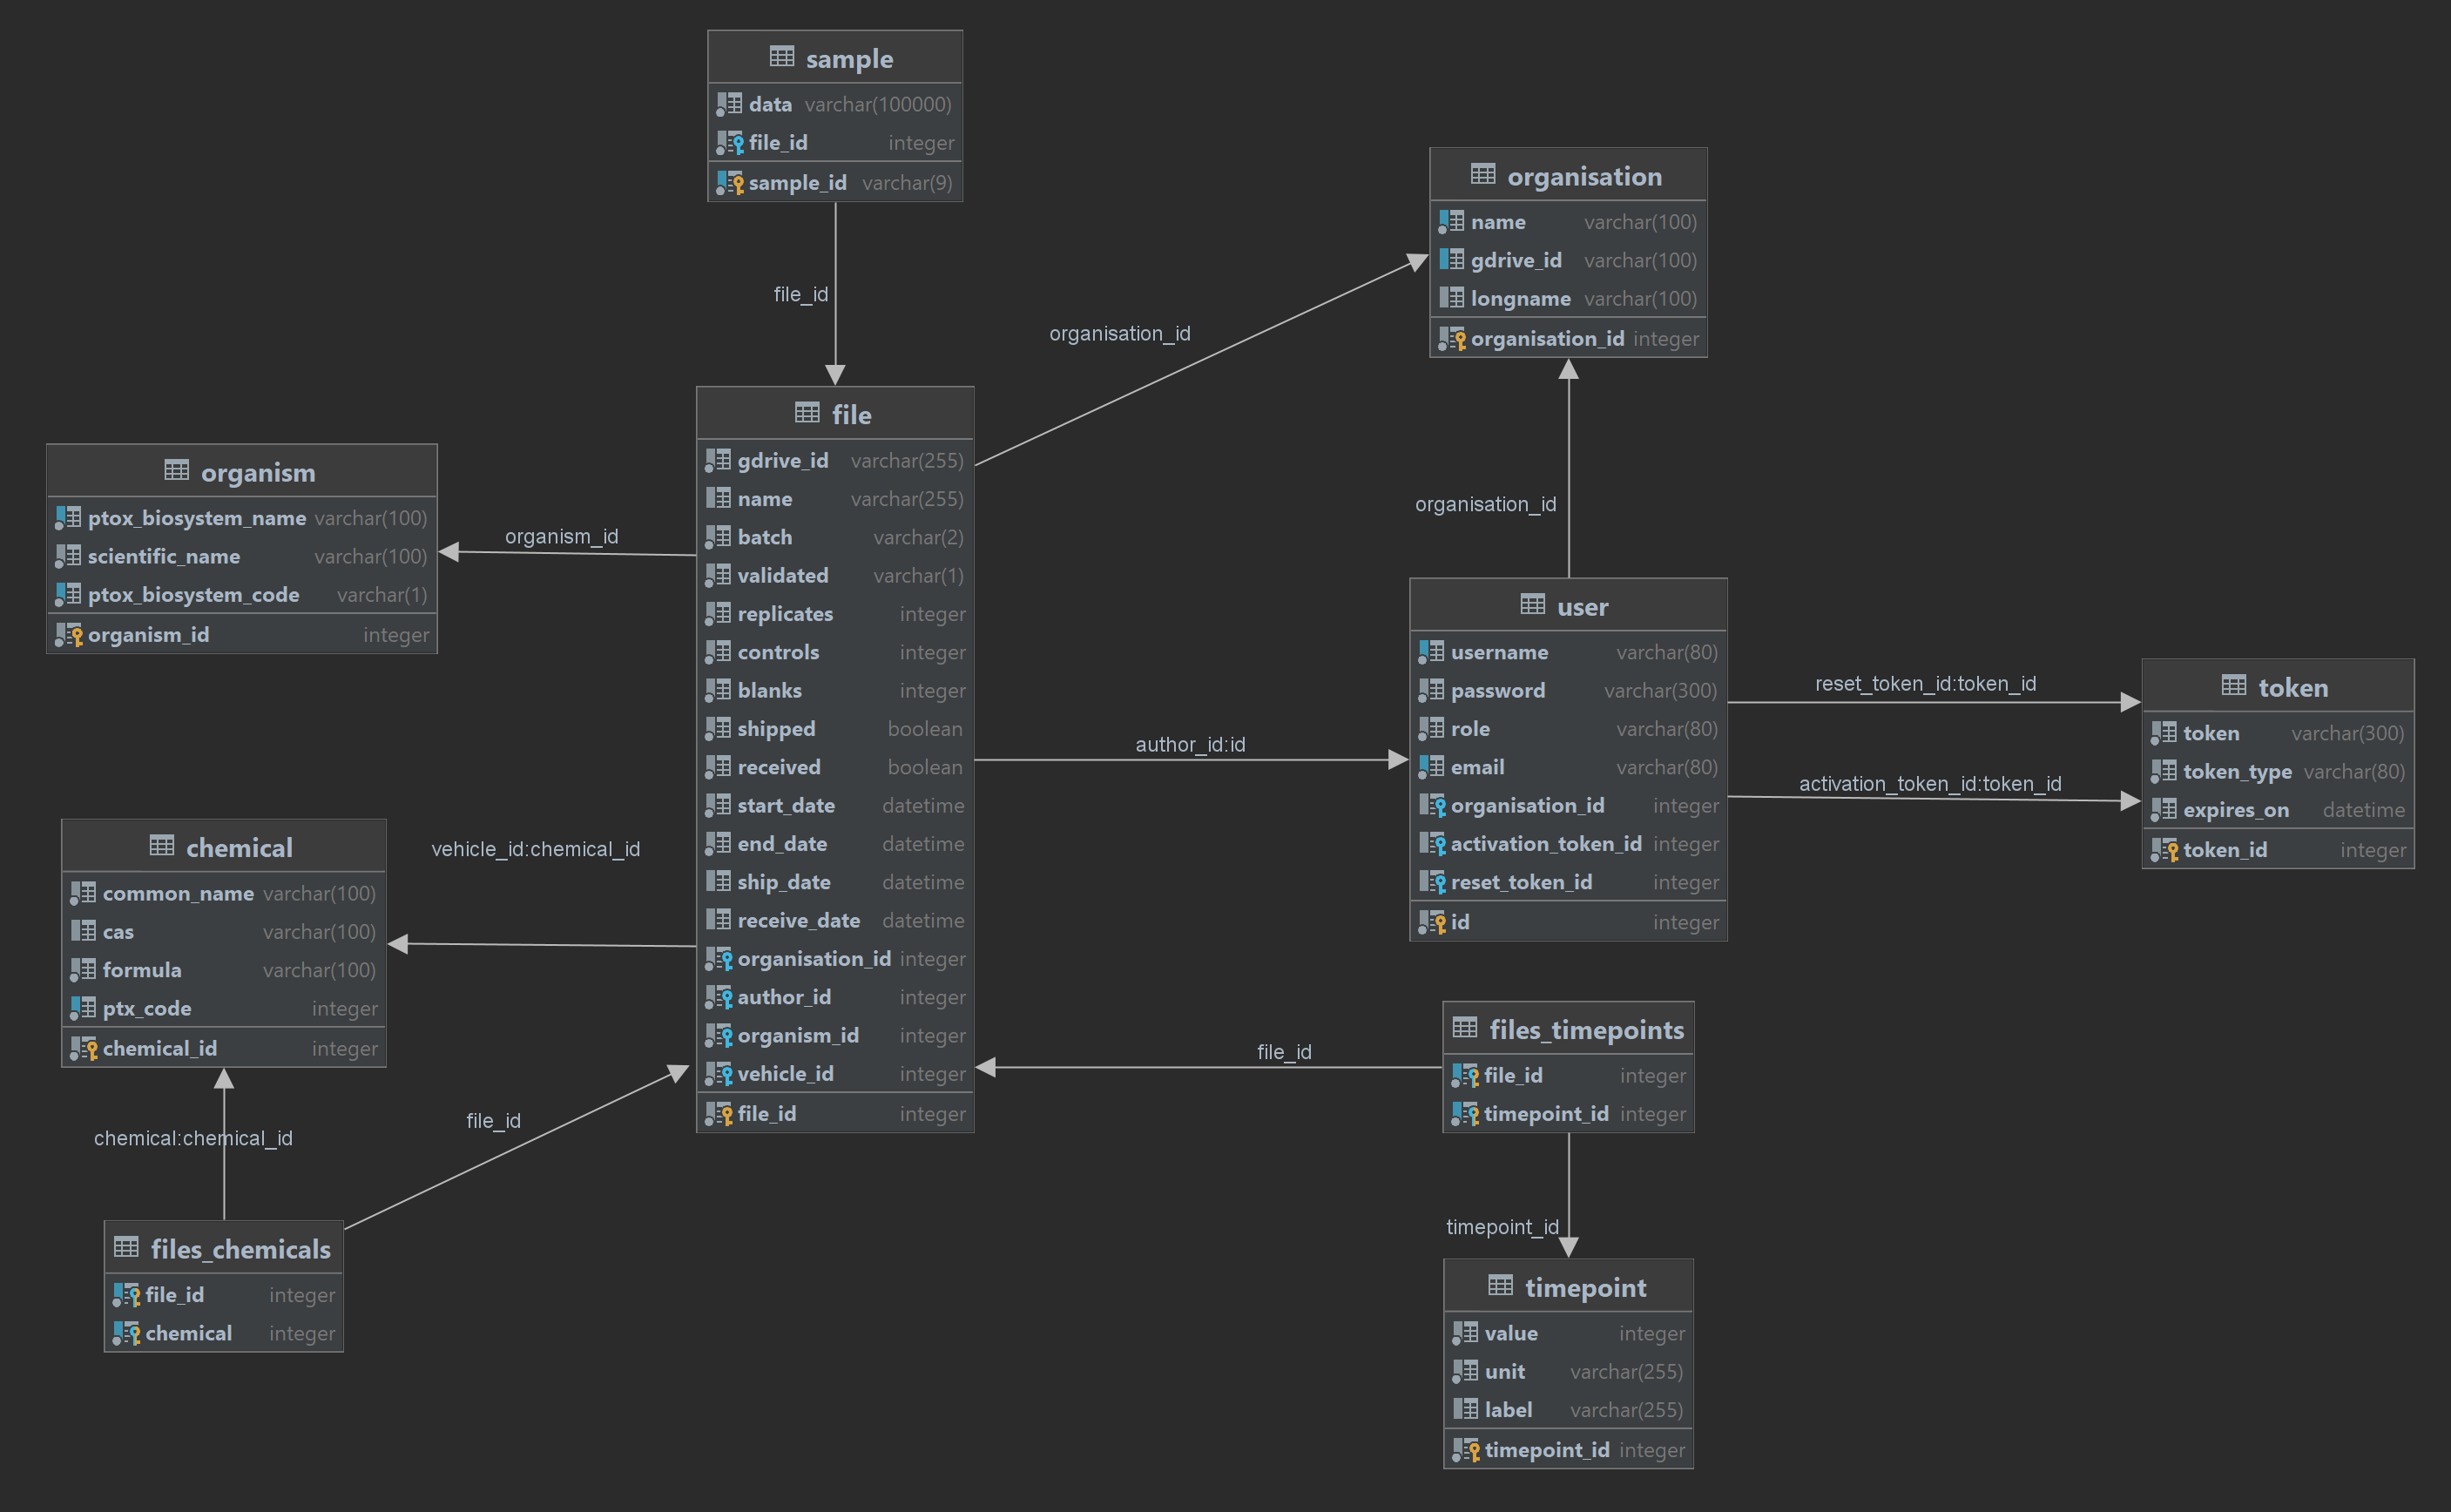
Database: Entity Relationship Diagram (ERD)
Development
Testing
You will need the development dependencies installed to run the tests.
coverage run -m unittest discover -s tests/
coverage report -m
Verify and generate the documentation
The documentation is generated using Sphinx and hosted on ReadTheDocs. It can also be generated locally after installing the development dependencies. For Unix based systems:
docstr-coverage ptmd/ --fail-under=100
cd docs
make html
For Windows:
docstr-coverage ptmd/ --fail-under=100
.\docs\make.bat html
Verify type hints
You will need the development dependencies installed to verify the type hints.
mypy --config-file=./mypy.ini